How to Install an Interior Door
How to install an interior door? When it comes to installing interior doors, pre-hung doors are the most popular choice. They come as a complete unit, including the door frame, making installation much easier. In this guide, we will walk you through the step-by-step process of installing a pre-hung interior door in your home.
How to install an interior door: Tools You Will Need
Before you begin the How to install an interior door process, gather the following tools:
- Wood chisel set
- Hammer
- 4′ level
- Nail punch
- Pry bar
- Screwdriver
- Utility knife
- Drill
- 2-1/8″ door hole drill bit
- 7/8″ spade drill bit
- Door lock installation kit
- Wood-cutting knife
- Hand plane
Preparation Before Installation
How to install an interior door? Before you start installing the door, there are a few things you need to consider:
Understanding the Door Frame: Interior doorframes consist of a head jamb at the top, flanked by side jambs on both sides. These jambs are installed in a rough stud opening, which is a hole in the wall framed by wall studs and a header. Once the jamb is in place, you can install any design of door or “slab” using specific door knobs and hinges to match.
Use a Quality Level: Having a good 4′ level is essential for a proper installation. Check its accuracy by laying it on a flat surface and noting the position of the bubble. Flip the level end to end and re-check the bubble. It should be in the same spot. If not, consider using another level.
Door Frame Size: The rough opening should be 2 to 2¾” wider than the door and 1″ to 2″ higher. Ensure that all corners are at 90° angles. Additionally, add the width of the door slab to ensure the combined door unit will fit in the door frame.
Door Width: The width of an interior door slab typically ranges from 24″ to 36″. For most rooms in the house, a 30″ door is suitable. However, for basement doors, a width of 32″ or greater is recommended. If you plan to keep a washer and dryer in the bathroom, consider installing a 32″ door or larger if space allows. Remember that the width of the door slab is different from the overall width of the frame, which adds an additional 2″ in width and 1″ in height. Standard doors are 80″ high, and it’s important to allow a clearance of ½” between the bottom of the door and the floor.
Hinges: The number and size of hinges depend on the type and thickness of the door. Hollow-core interior doors usually have two hinges, while heavier solid-core doors should have at least three.
Floor Allowances: If you plan to install carpet or hardwood in adjoining rooms, you can adjust both jamb sides from 3/8″ to 1″ above the floor, depending on the material that will be installed.
Painting: If you intend to paint or stain your door, it’s best to do so before installation. By laying the door flat, it will be easier to apply paint or stain without any running or drip lines.
How to install an interior door.Now that you have prepared the necessary tools and considered the important factors, let’s move on to the step-by-step installation process.
Step 1: Build the Door Jamb

1. Measure the door frame between the jack studs (vertical studs) from under the header to floor level to ensure the combined width of the door slab and door jamb will fit.
2. Cut the door jambs to match these measurements. Subtract ¾” from each side of the door header to account for the thickness of the two-door jambs (continued from previous response)
3. Cut a notch in the bottom of each jamb to fit over the threshold. The notch should be the same depth as the thickness of the threshold.
4. Cut a groove in the inside of each jamb to fit the weatherstripping.
5. Attach the hinges to the jamb. The top hinge should be 7″ from the top of the jamb, the middle hinge should be centered, and the bottom hinge should be 7″ from the bottom of the jamb. Use screws that are long enough to penetrate the jamb and the stud at least 1½”.
6. Install the strike plate on the jamb where the latch will engage.
Step 2: Install the Door Jamb
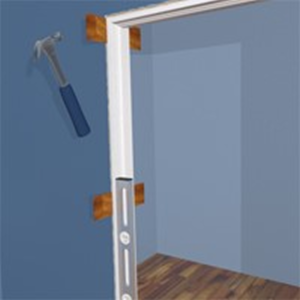
1. Place the door jamb in the rough opening and check for level and plumb. Shim the jamb as needed to ensure it’s level and plumb.
2. Secure the jamb with 8d finish nails, nailing through the shims into the jack studs.
3.Cut the shims flush with the jamb using a utility knife.
4. Test the door by swinging it open and closed. Adjust the shims as needed to ensure the door swings freely and closes properly.
Step 3: Install the Door
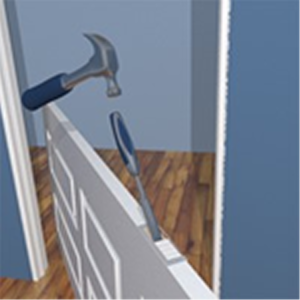
1. Remove the hinge pins from the jamb by tapping them up with a hammer and nail punch.
2. Place the door into the jamb, making sure the hinges line up with the hinge mortises.
3. Insert the hinge pins back into the hinges by tapping them down with a hammer and nail punch. Ensure that the pins are fully seated and secure.
4. Test the door by swinging it open and closed. Adjust the hinges as needed to ensure the door swings freely and closes properly. If the door rubs against the jamb or floor, you may need to adjust the position of the hinges or use a hand plane to remove some material from the door edge.
Step 4: Install the Door Knob and Lockset

1. Measure and mark the location of the doorknob and lockset on the door. The standard height for a door knob is 36″ from the bottom of the door. However, you can adjust the height based on your preference and any specific requirements.
2. Use a hole saw to drill the hole for the door knob. The size of the hole will depend on the specific door knob you are installing. Follow the manufacturer’s instructions for the correct size.
3. Use a spade bit to drill the hole for the lockset. The size of the hole will depend on the specific lockset you are using. Again, refer to the manufacturer’s instructions for the correct size.
4. Install the latch and strike plate on the jamb. The latch is the mechanism that extends into the strike plate to keep the door closed. Follow the manufacturer’s instructions to properly install and align the latch and strike plate.
5. Install the door knob and lockset according to the manufacturer’s instructions. This typically involves attaching the exterior and interior knobs, connecting the spindle, and securing the lockset in place. Make sure everything is properly aligned and tightened.
Once you have completed these steps, you should have successfully installed the interior door, including the door jamb, hinges, and door knob/lockset. Take the time to test the door to ensure it opens, closes, and latches smoothly. Make any necessary adjustments, such as tightening screws or adjusting strike plates, to achieve the desired functionality.
How to install an interior door. Remember, if you encounter any difficulties or have specific questions during the installation process, it’s always a good idea to consult the manufacturer’s instructions or seek assistance from a professional.